
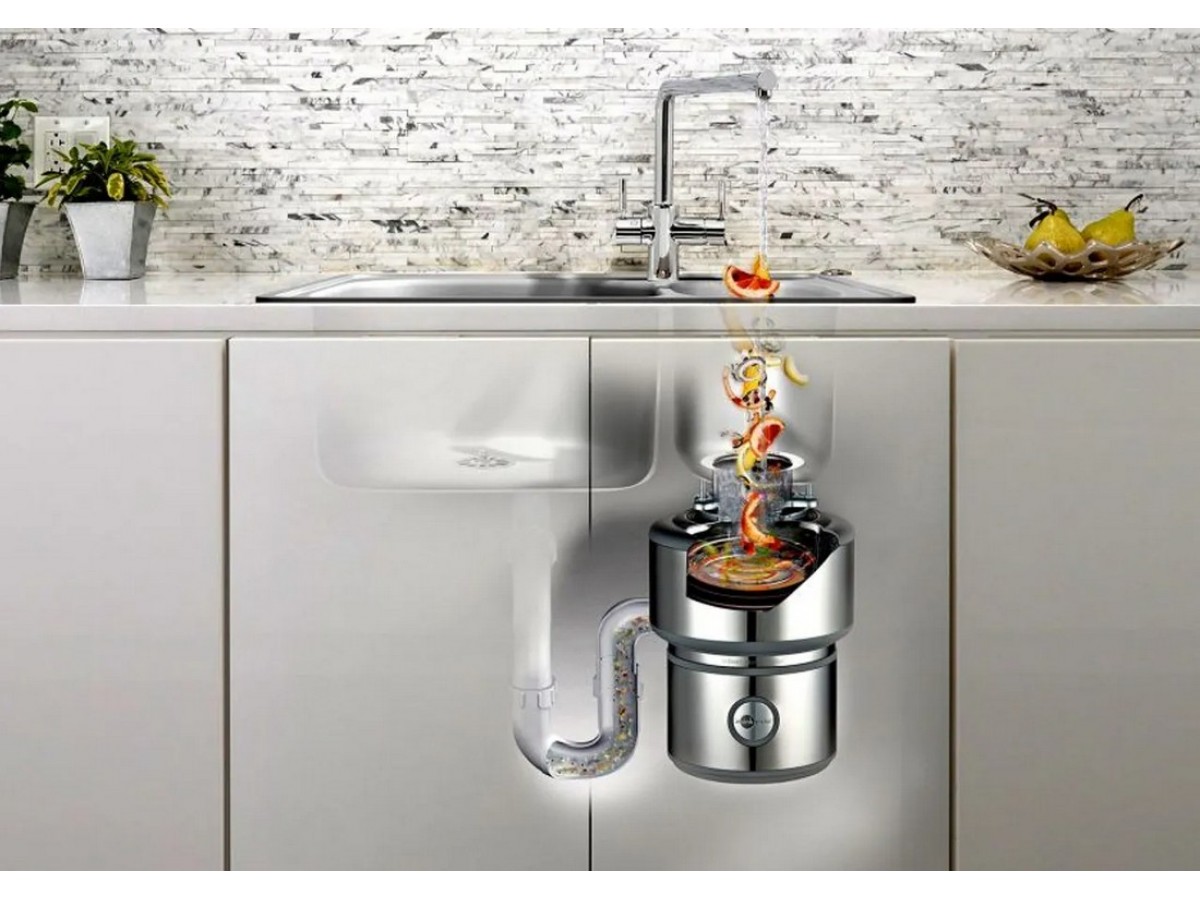
A modern kitchen is a functional space where it is comfortable to stay, cook and easily maintain order. In creating a comfortable kitchen, modern kitchen appliances play an important role - dishwashers, food processors, devices for quick heating and cooking, as well as food waste disposers for the sink. Shredders in the US are used in about 50% of homes. In Ukraine, the popularity of shredders is growing every year, as the equipment has become more affordable, and more and more users can appreciate its advantages in business.
The Leomikao company supplies the Ukrainian market with modern functional shredders of Japanese design. On our website you will learn all the pros and cons of the food waste disposer. And in this article we will talk in detail about how to install a food waste grinder on a sink.
What starts the installation of a food waste shredder
Functional solutions such as a food waste disposer for the sink are very important. They solve a lot of problems associated with the storage and disposal of leftover food:
- odor elimination;
- insect control in the kitchen;
- maintaining cleanliness;
- minimum effort for cleaning;
- environmental friendliness.
The first step to equipping your kitchen with a food waste disposer is choosing a device. You can read about how to choose a chopper for the kitchen in our blog.
The second step is preparation for installing the grinder. Disposers are electrical devices, which means that you must first install a power source in the immediate vicinity of the sink. Given the operating conditions, this must be an isolated power supply system.
When the necessary preparatory work has been carried out, and the food waste grinder itself is ready for installation, the installation of the device is carried out strictly according to the instructions. Carefully study the installation and operation manual of the product from the manufacturer.
If the chopper is equipped with a pneumatic button, you need to prepare a hole for it in the sink (countertop). In order for the button to function correctly, the length of the air hose is adjusted during installation. To fix the button, the hole is treated with silicone.
Food waste disposer - how to install?
For a correct installation, the details are important:
- the right choice of sink;
- type of siphon suitable for the grinder;
- proper drainage equipment.
The disposer is a fairly heavy device, so the quality of washing is far from the last value. The type of material does not matter (stone, stainless steel). Basic requirements for washing: quality, strength and the presence of a drain hole with a diameter of 90 mm or more.
If a recessed sink is installed in the kitchen, it is recommended to additionally strengthen it with metal brackets.
A siphon is needed to connect the sink drain and the drain pipe. In combination with a disposer, a smooth-walled siphon is used: corrugated or bottle siphons are not suitable for the operation of the grinder. The corrugation will clog very quickly, since all the crushed waste will linger on the relief surface of the siphon.
Instead of a waste hose, it is better to use a sewer pipe ø40-50 mm. The lack of flexibility is compensated by sewer bends with different bending angles, which will also help create the necessary slope.
Please check the following before installation:
- chopper height and width;
- the distance between the bottom of the sink and the center line of the drain hole;
- distance between the center of the drain hole to the end of the pipe;
- the distance between the vertical center of the dispenser and the center of the filter connection.
Food Waste Disposers: Installation
We have come close to answering the question of how to install a food waste disposer on a sink. Disposer installation includes several steps:
- Assembly host installation.
- Attaching the siphon and drain pipe to the grinder.
- Disposer installation.
- Air button installation.
- Installation of stopper and splash guard.
- Checking the quality of the installation.
Sub-assembly installation
The installation site of the assembly unit is the drain of the kitchen sink. Subsequently, the dispenser itself is attached to it. Assembly elements:
- sink flange;
- rubber pads;
- support ring;
- mounting ring;
- screws;
- retaining ring.
Mounting order:
- Install the flange with the rubber gasket into the drain hole of the sink.
- Install other elements on the flange in the following order: rubber gasket, if included in the package - cardboard gasket, mounting ring, retaining ring. Putting on the retaining ring, you need to make some effort.
- Align the inscription on the flange with the sink.
- Lock the spacer screws with a screwdriver.

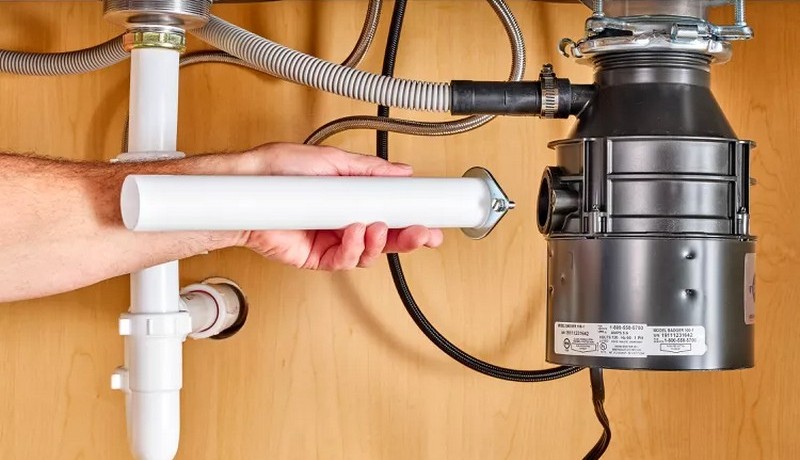
Connection to the siphon and drain pipe dispenser
The siphon creates a water barrier and prevents the spread of unpleasant odors from the sewer system in the room. A drain pipe with a clamp is attached to the outlet of the grinder. Most often it is a spring type of fixation. The spring clamp ensures a tight and secure fastening that can withstand strong water flow.
In many dispenser models in the upper part there is a pipe with a plug. It is designed to connect the device to the dishwasher. The overflow of a kitchen sink must not be connected to the inlet, because during use it can get particles of crushed food, which will cause an unpleasant odor.
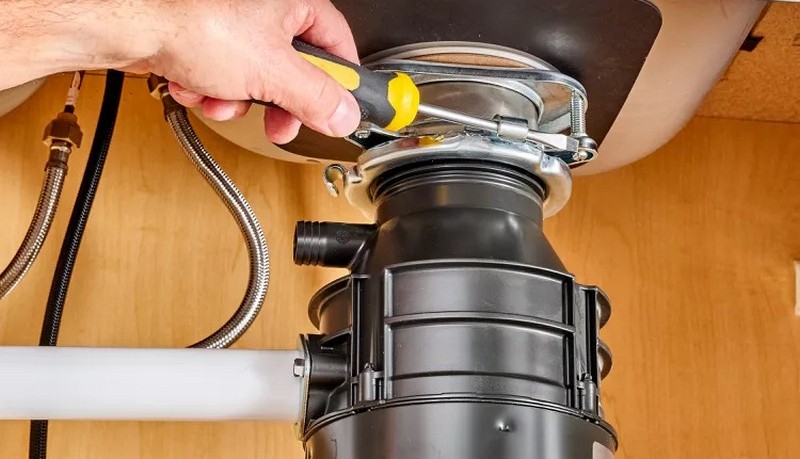
Disposer installation
The dispenser must be screwed onto the assembly. After the device is firmly seated on the mounting ring, it is necessary to insert the service key into the eyelet and turn it counterclockwise until it stops.
Then connect the drain pipe to the sink overflow, and the siphon to the sewer system (using a drain pipe and sewer outlets). The slope of the drain pipe should be about 2-3 cm per meter so that the waste flows continuously into the sewer.
Air button installation
When a sink food waste disposer is installed, a pneumatic button is installed. For her, a hole of a suitable diameter is preliminarily prepared in the countertop. You can make a hole with a diamond crown (if the countertop is made of granite, agglomerate, acrylic or marble) or a hole saw (in the MDF fiberboard countertop). For high-quality fixation, the edge of the hole must be treated with a sealant.
The most convenient location of the pneumatic button is near the mixer, since water must be turned on to start grinding waste, and after grinding it is turned off. No need to be afraid of hitting the button with water. There are no conductive elements in the pneumatic system, so it is absolutely safe.
The order of mounting the elements of the pneumatic button:
- Button.
- Stainless steel washer.
- Rubber gasket.
- Tabletop.
- Polymer fixing nut.
Before installation, it is also necessary to measure and cut the required length of the pneumatic tube. One end of the tube is put on the fitting located in the lower part of the dispenser, and the other end is put on the fitting of the button. Be sure to check the complete immersion of the tube and the tightness of the fixation. If the connection is poor, the tube may come off when the air button is pressed.
Some dispenser models are equipped with a wireless activation system. The remote control button does not need to make a hole in the table top. It can be attached to the wall above the sink using double-sided tape.
Installing the stopper and splash guard
The splash guard is made of rubber. It is installed under the sink. It opens when the waste enters the chopper chamber, and then closes on its own when work is completed. It not only protects against splashes, but also reduces noise.
Not all dispensers are equipped with a stopper. The stopper is a stainless steel mesh filter complete with a lid and stopper. It protects the appliance from accidental contact with cutlery and other items not intended for grinding.
Checking the correct installation
To check the quality of the chopper installation, the drain hole must be closed with a plug and some water must be drawn into the sink. If you did everything correctly, then moisture should not appear at the joints under the sink.
If there are no problems in the design itself, you can begin to check the working functions of the disposer. For the first session, small and soft food waste, such as lettuce leaves, is suitable. Water should be able to drain freely from the sink and all connections under the sink should remain dry.
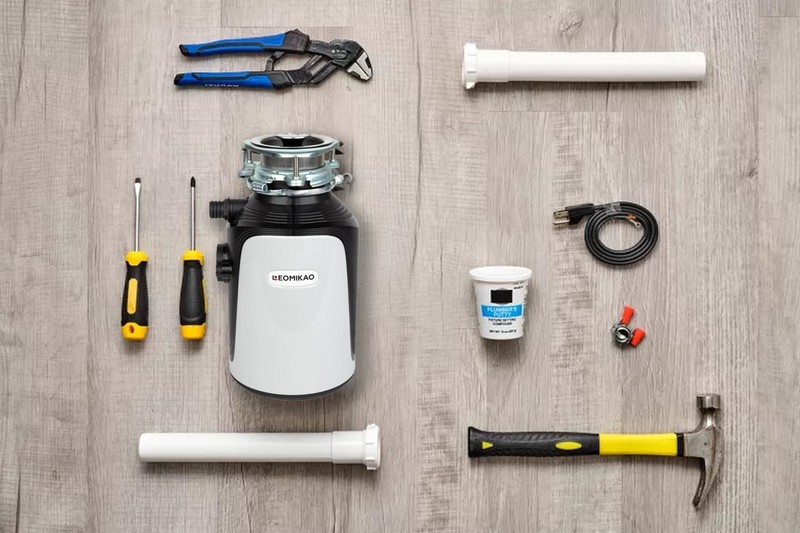
What tools are needed to install a food waste disposer
To perform a complete cycle of installing a dispenser in the kitchen, you will need the following tools:
- construction knife;
- crosshead screwdriver;
- hacksaw;
- screwdriver;
- ruler (roulette);
- marking pencil;
- hole saw for wood or diamond crown.
Food waste disposer - how to install? Safety regulations
Safety requirements for the installation of electrical equipment:
- Before starting installation, do not forget to read the instructions - each model has its own installation features.
- When checking the operation of the disposer and during its operation, do not put your hands into the opening of the grinder.
- When checking and operating the grinder, make sure that no foreign objects or non-food waste get inside.
- If you are not familiar with the basics and rules for installing and operating electrical networks and appliances, entrust the installation of a food waste disposer for the sink to professionals.


